|
 The
"box" sat on the starboard forward corner
of the aft Boat Deck's 2nd class entrance behind the
raised smoke room roof. The
"box" sat on the starboard forward corner
of the aft Boat Deck's 2nd class entrance behind the
raised smoke room roof.
We
have not heard any definite conclusions as to what purpose
of this "box" shaped object served but we know for certain
that it existed. See any uncropped version of the starboard
Cork Examiner photograph.
Make
one from plastic stock, using a section of sprue tree
sanded into a square shape. Cut this to a length of
3mm. This "box" sat on a raised base and was not flush
to the planking, so make a tiny base from a cross section
of sprue. Glue the stand to the deck in the proper location
and then glue the "box" on to the top of it. A conduit
can be seen running from the base of the "box" down
to the deck planking. Use a length of pulled sprue to
simulate this.
For
the lid/cover on top of the "box" cut a square of sheet
plastic slightly larger than the perimeter of the "box"
and glue into place. Paint the lid light gray and the
"box" and conduit flat white.
|
BEADING
There
was a brown 'beading' along the edge of the roof along the
back of the Boat deck, A and B decks, the officer's deckhouse,
Gym, and bridge.
Simulate
this by gluing 4lb fishing line along the Evergreen strips
roughly in the center. Paint it brown with a thin tipped brush
-dragged- along the fishing line 'beading'. You may want to
paint the line first before gluing but the glue can bother
the paint when trying to place. We found it easier to just
load the brush with minute amounts of paint and drag it along
at an even pace and pressure.
EXPANSION
JOINTS
One
method is to cut a strip of masking tape 1mm wide with a straight
edge and sharp hobby knife. While still stuck to the table
paint it flat military brown or leather. Then pull it up from
the table and cut it to a length. It needs to be long enough
to go from the port bulkhead, across the deck, up the Officer's
Quarters walls, over the roof, then down the starboard wall,
across the deck to the starboard bulkhead.
This
was repeated for the aft expansion joint measuring it along
the planking from one side of the superstructure to the other.
Then
drybrush a line down the outside edge of the superstructure
and B deck to simulate the joint, again using the brown. It
should be more pronounced on the starboard side because the
port side was dressed up for the public before launch having
faced the crowd at Southampton.
Brown
India Ink and a small ruler may also work but we have not
tried this ourselves. Another idea is to run a nail file on
its edge across the roof, walls, and planking to create a
slightly recessed line for a more 3-dimensional effect.
HANDRAILS
& RAILINGS
Item
1 (improving the bulkhead handrail caps).
To
simulate the handrail caps seen along the Bridge/Wingcab bulkheads
and bulwarks down each side of the superstructure on A and
B decks, glue Evergreen sheet plastic strips onto the tops
of the bulkheads/bulwarks. Paint them brown .
Though
this step is not really necessary we found it gave a better
overall appearance to the bulwarks.
Item
2 (improving the deckhouse handrails).
Use
the following guide for the hand rails...
- Boat Deck: All
rails on the Boat deck deckhouses were white.
- A Deck: All
handrails were brown on except for those around the Palm
Court. One of the best ways of doing these rails is to use
a brown waterproof fine tipped marker pen and a straight
edge like a metal ruler.
- B Deck: All
handrails were brown.
Item
3 (Railing kickstrips).
All
of the railings except some on the deckhouse roofs had a kick
board at their base. This includes the railings on the forecastle
and the poop deck.
Glue
K1 Evergreen plastic strips on their side to simulate these.
The kickstrips will aid tremendously in attaching the brass
Gold Medal Models or Tom's Modelworks photoetched railings
as it gives them something to "bite" against. Paint white.
It also gives the deckhouse a nice clean edge.
Measure
and cut them to the lengths you need and apply them with model
glue. These were also applied to the bow facing poop deck/aft
well deck bulkhead (above #6 hatch) and to the forecastle/well
deck bulkhead. Make sure to leave the openings for the stairways
on both.
- Note:
Both GMM and Tom's railings have this kick strip built into
the railings. It is up to the modeler if they wish to add
the K1 kick strip to assist in gluing the rails into position.
Item
4 (No 4 Funnel deckhouse/vent safety rail).
Add a panel of safety railing between the vents and
deckhouse bulkheads.
Make this from spare panels of brass photo etched
railings and paint them white when glued into place.
If you are using Tom's misc set a good substitute
are the spare parts for the forward anchor well grate.
|
 |
Item
5 (No 1 Funnel safety rail).
There were seven
poles along each side of the No1 Funnel with a safety line
strung between them. See page 44 of Exploring The Titanic
for their location. Create these from micro rod or pulled
sprue and string 4lb test line between them.
Paint the poles
white and the line light gray.
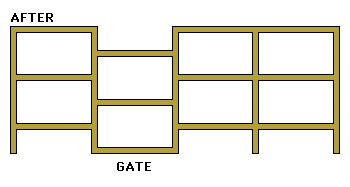
Item
6 (Boat Deck class divider railings).
For
the Boat Deck class divider rails use left over Lusitania
rails from the GMM Merchant Marine Titanic/Lusitania kit.
To
make a `class area divider' take a span of 6 bar railing and
cut to create a three bar railing with a gate.
Remove
the top rail where the gate will go while keeping the rest
intact. Then remove EVERY OTHER rail segment down each panel
until the bottom is reached. This will leave a bottom rail
for the gate while the other sections will have single posts.
Apply CA glue to the bottom of the gate rail and down one
outside post and glue it to a deckhouse wall and deck floor
planking. Then once secure, tack the rest down using a pin
point for gluing to keep glue marks on the deck to an absolute
minimum.
|
|
|
When cut with the hobby knife it
should look like this:
|
|
|
Keep
the rails you had removed for they will be of use with the
next specialty item.
Item
7 (Tank Room railings).
There
was a railing/catwalk along the top of the Tank room roof.
Pictures of the Olympic show them with the tank room covers
resting in an upright position against them.
Make
these out of spare GMM or Tom's Modelworks "1-bar" brass photoetched
railings. If you have no 1-bar left you can use others but
make sure to trim the interior rails off leaving only the
top and bottom rail. Photos of the Titanic's show that there
were four panels down each side and one panel at either end,
totaling 10 panels. Due to the scale of the railings when
compared to the model part you can actually fit 5 panels down
the sides of the catwalk but to be historically accurate you
should only have four! If you jockey them around and be generous
with the end panel bends the four will fit and look pleasing
enough to the eye.
After
you bend the panels to the 1,4,1,4 configuration join the
open corners together with CA glue and then glue it to the
tank room. Paint the railing white.
STORAGE
BOXES
According
to Titanic and Olympic diagrams it appears as though there
were storage boxes spread around the Boat Deck and A-Deck
forward.
Make
a small box from plastic stock sand into a rectangular shape,
then glue it into the recessed corner of the starboard wing
cab aft bulwark.
Outboard
of this box was another more trunk like box. This is thought
to have stored the falls for the lifeboats. Mirror this trunk
on the port side aft wing cab bulwark.
In
the corners of the A-deck forward open promenade appear to
be small boxes. These were thought to store the sounding cables
when they were not in use. As before, fashion these from plastic
stock sanded into a rectangular shape no higher than 50% of
the height of the bulwarks. Glue them all into place and painted
them with Model Master Leather to simulate a darker wood.
 See
the
See
the 
 There were
three large reels on the Titanic. One on the port
side of the forecastle just aft of the winch behind
#1 hatch and two on the poop deck, one to each corner
outboard of the well deck stairs. These had canvas
covers when not in use.
There were
three large reels on the Titanic. One on the port
side of the forecastle just aft of the winch behind
#1 hatch and two on the poop deck, one to each corner
outboard of the well deck stairs. These had canvas
covers when not in use.  IMPROVING
THE ELECTRIC WINCHES
IMPROVING
THE ELECTRIC WINCHES 
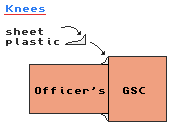 In
the corners of the aft end of the Officer's deckhouse
where it joins with the wider Grand Staircase foyer
deckhouse you will see knee wings along the roof line
rather than a tight right angle. These can be seen in
the wreck mosaic in the October 1987 National Geographic
or Robert Ballard's "Discovery Of The Titanic".
In
the corners of the aft end of the Officer's deckhouse
where it joins with the wider Grand Staircase foyer
deckhouse you will see knee wings along the roof line
rather than a tight right angle. These can be seen in
the wreck mosaic in the October 1987 National Geographic
or Robert Ballard's "Discovery Of The Titanic".

 Create a small
mushroom vent by drilling down the centre of a 1.5 dia piece
of sprue with a 1mm drill bit. Then glue a 1mm piece of sprue
into the hole you just drilled. Allow to dry. Trim the larger
diameter sprue to about 1mm, this will become the head of
the vent. Trim the narrow section to about 4mm.
Create a small
mushroom vent by drilling down the centre of a 1.5 dia piece
of sprue with a 1mm drill bit. Then glue a 1mm piece of sprue
into the hole you just drilled. Allow to dry. Trim the larger
diameter sprue to about 1mm, this will become the head of
the vent. Trim the narrow section to about 4mm.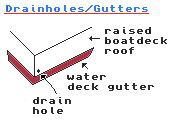 In
the corners of the raised roofs of the lounge, reading/writing
room and the smoke room are drain holes. Add them as
you did the window clips and circular sill objects.
Dip thinly pulled sprue into black paint and touch the
corners. Refer to Illustrated History (page 42, 103,
etc.).
In
the corners of the raised roofs of the lounge, reading/writing
room and the smoke room are drain holes. Add them as
you did the window clips and circular sill objects.
Dip thinly pulled sprue into black paint and touch the
corners. Refer to Illustrated History (page 42, 103,
etc.).
 The
forward protrusion of the No4 Funnel deckhouse was a duct that
lead down to the Galley on B Deck. It is assumed that there
was a grate similar to the Fidley grates over the top of this
duct.
The
forward protrusion of the No4 Funnel deckhouse was a duct that
lead down to the Galley on B Deck. It is assumed that there
was a grate similar to the Fidley grates over the top of this
duct.
 This fix is for the half height gates
in the hull on the open promenade (one forward, two
aft, on either side of the ship). The railing across
the top of these doors was cut to allow the door to
open, there were brass plates where the breaks occurred
to stop wear to the timber. Refer to Marschall's painting
on page 44 of Exploring The Titanic.
This fix is for the half height gates
in the hull on the open promenade (one forward, two
aft, on either side of the ship). The railing across
the top of these doors was cut to allow the door to
open, there were brass plates where the breaks occurred
to stop wear to the timber. Refer to Marschall's painting
on page 44 of Exploring The Titanic.
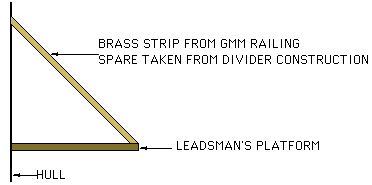 On
the port and starboard sides of the forward open promenade
on A-deck were small foldable platforms called the Leadsman
platforms. A crew member stood on the platform and threw
a rope with a weight into the water to determine how
deep the water was when maneuvering in port. You have
two choices here, to present them in an open or closed
position.
On
the port and starboard sides of the forward open promenade
on A-deck were small foldable platforms called the Leadsman
platforms. A crew member stood on the platform and threw
a rope with a weight into the water to determine how
deep the water was when maneuvering in port. You have
two choices here, to present them in an open or closed
position.  A
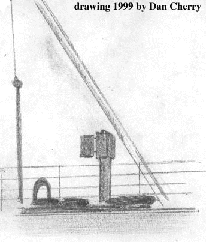
DECK NO 4 CARGO HATCH MYSTERY OBJECT.
A
DECK NO 4 CARGO HATCH MYSTERY OBJECT.
 Thanks
to Dan Cherry for this new find and the drawing.
Thanks
to Dan Cherry for this new find and the drawing.

 We have crew members undertaking duties
like rope stacking, deck mopping, davit repair, signaling,
etc.
We have crew members undertaking duties
like rope stacking, deck mopping, davit repair, signaling,
etc.
 As
we have the band on deck they needed to have instruments.
After we bent the arms into the appropriate poses
we fashioned the bows for the bass fiddle and smaller
fiddles out of rails from a single GMM railing panel.
Once they were separated by a hobby knife we dabbed
a small bit of CA glue to the people and fiddle and
then using a toothpick which had been moistened touched
it to the rail/bow which picked it up and allowed
for us to position it on the hand and fiddle. This
tiny detail pays big dividends in making the band
look more realistic.
As
we have the band on deck they needed to have instruments.
After we bent the arms into the appropriate poses
we fashioned the bows for the bass fiddle and smaller
fiddles out of rails from a single GMM railing panel.
Once they were separated by a hobby knife we dabbed
a small bit of CA glue to the people and fiddle and
then using a toothpick which had been moistened touched
it to the rail/bow which picked it up and allowed
for us to position it on the hand and fiddle. This
tiny detail pays big dividends in making the band
look more realistic.
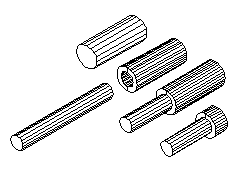
 You
can create the hoses out of pulled sprue.
You
can create the hoses out of pulled sprue.
 Use
the kit's rigging thread to make ropes. First fold a
loop of masking tape, sticky side out and press it flat
to the table top. Cut the threads to length and either
coil them manually or in a lazy figure 8 (as seen in
the ropes that lay behind the forecastle's break water
bulwarks). After you have the shape
Use
the kit's rigging thread to make ropes. First fold a
loop of masking tape, sticky side out and press it flat
to the table top. Cut the threads to length and either
coil them manually or in a lazy figure 8 (as seen in
the ropes that lay behind the forecastle's break water
bulwarks). After you have the shape