|
This
section of the Official Titanic Scale Model Tutorial will deal
with the many inconsistencies with the windows around the decks
of the Minicraft Titanic model.
FIXING
THE WINDOWS
All
of the windows are badly formed and most are molded in reverse.
There
are now three existing solutions to this problem; replacement
with photo etched parts, using decals or replace the mullions.
|
|
|
Method 1 (photo etched windows).
Tom's modelworks has just released his new brass
window sets and this is without reservation the best way to
put windows on your Titanic model.
You simply have to:
- remove the existing mullions
- clean up the rough edges
- paint the windows
- paint the bulkhead
- apply the windows
A simple and very effective solution.
Method
2 (decals).
Bruce
Beveridge has come out with an excellent sheet of 1/350 window
decals as mentioned in the EXTERNAL
SUPPORT PRODUCTS section. All the ordering detail can be
found there. In the meanwhile here is Bruce's suggestion in
how to apply them to the model:
"The
modeler will achieve the best results by first removing the
model's original window mullions and then replace them with
the decals." He states that the decals are of a high quality
so acetate backing is -not- required (although still optional).
It is recommended that the you fill in the larger windows with
white glue or KK like product, this gives the decal a bit more
backing and once applied no decal setting agent should be necessary.
The
smaller windows should be fine with just the decal placed over
the opening.
Method 3 (scratchbuilding).
For
those who like a truly scratch built solution you can replace
the mullions using two methods:
First
you must remove the existing mullions and tidy up the edges
of the window with square or round files depending on the shape
of the window. Be careful not to over file or you will end up
with a larger window than you had originally planned. Also be
sure to keep the file level so you keep the window square.
There
are two approaches to replace the mullions that will work for
any type of window:
Approach
1:
 Step
1. Step
1.
Lay K1 strips
along the back of the wall to create the horizontal
mullions. You can handle several windows at a time if
they are next to each other.
Step 2.
Lay the upright
mullions either behind the horizontal mullions as in
the diagram opposite or cut to size and placed in front,
whichever works for you.
Step 3.
If angled
mullions are required cut the ends of two K1 strips
at 45 degrees and then slot the points in between the
upright mullions to get a secure anchor point.
|
Approach
2:
This
method is the more historically accurate but is considerably
more time consuming and you will go through a lot of K1 strip
in trial and error.
 Step
1. Step
1.
Use the
same methods as above but DO NOT glue the strips to
the back of the wall, only glue them to each other.
See diagram opposite.
Step
2.
When you
have formed the mullions for your window, trim them
to the exact size of the window you are replacing.
Then glue into the window flush with the surface of
the wall. You may need to do a little bit of filling
and sanding to get the right finish.
|
|
|
|
|
CREATING YOUR OWN ARCHED WINDOW
To create
the missing windows on the 1:350 Minicraft model you will have
to cut into the walls. The following is a simple method of doing
this:
|
Step 1.
Score or
mark up rectangular perimeter of window with pencil.
Window is approx. 2.75 mm x 4.5 mm. Distance from bottom
of wall is 2.5mm.
|
 |
|
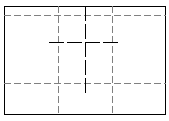
Step 2.
Mark centre
point of the arch.
|
 |
|
Step 3.
Drill small
guide hole.
|
 |
|
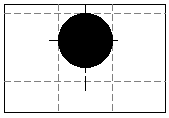
Step 4.
Drill hole
at 2.5mm diameter using guide hole.
|
 |
|
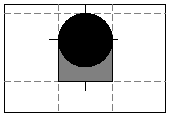
Step 5.
Using a very
sharp hobby knife carefully carve out the bottom section
of the window.
|
 |
|
Step 6.
Carefully
file the window into its final shape using square and
round files. DO NOT over file and check that the bottom
sill of the window is level.
|
 |
|
Step 7.
The final
product.
|
 |
|
|
|
|
INSTALLING
GLASS
If you
are not using Bruce's decals there are a couple of options if
you wish to install glass into the windows on your model.
Option
1:
Place
clear acetate behind the windows.
The
flash of acetate through the hull portholes,windows, etc. adds
a great deal of realism to the model.
Place
acetate strips in behind most of our windows including the bridge,
2nd class entrances, hull, #3 and #4 funnel deckhouses, etc.
Other windows we used Kristal Klear.
Fasten
the acetate on with either model glue or white glue but NOT
CA glue because it will fog the acetate. You will need to measure
each section you wish to acetate separately. Use cellophane
tape to help hold larger panels as well as the glue, experience
has shown that the acetate will tend to pop off once and awhile
and this can be a big headache if you already have decks glued
together.
Option
2:
Fill
the windows with Krystal Klear by creating a 'bubble' in the
hole.
You
will probably use a combination of both, acetate for the larger
windows and KK for the portholes and smaller windows. The choice
is yours.
See
EXTERNAL SUPPORT MATERIALS
for information on Krystal Klear.
|
|
|
|
FILLING
UNWANTED WINDOWS
If you
only use putty to fill unwanted windows you run the risk of
it cracking or falling out. We always sealed the opening from
behind with a piece of sheet plastic. This gives the putty better
adhesion by giving it a backing to push against and grip to.
|
|
|
|
OPEN
WINDOWS
 To
animate the ship some of us elected to have open windows
along the Officer's deckhouse bulkheads. To
animate the ship some of us elected to have open windows
along the Officer's deckhouse bulkheads.
Create the windows out of small sections of an A/M
ratline, sand these down and glue to a window frame
in an open position. Use these ONLY if you have bought
the GMM or Tom's Modelworks replacement brass photoetched
ratlines!
Not all of the windows could open. The windows that
did open have a small circular object beneath their
sill. Add the circular object by dipping the tip of
thinly pulled sprue into brown paint and then touching
under the bottom sill in a center.
The
opening windows also had retainer clips on the deckhouse
bulkheads to the bow side of the frame. The bottom
section of the windows opened towards the bow (for
splash control) the top section opened out and upwards.
Make the retaining clips by dabbing thinly pulled
sprue into gray paint. Paint the clip one window width
away from the bow window frame. So when the window
was swung open, the handle on the frame could fit
into the clip.
Fill
all of these open window frames with Kristal Klear
to simulate glass.
|
|
|
|
|
WINDOW
CORRECTIONS
Corrections
are arranged by deck from bow to stern.
C DECK
|
Forward
Well deck.
The
"bumps" on the forward wall of the C deck cabin are
portholes molded in reverse. Drill them out.
These
portholes can be seen clearly in National Geographic's
"Secrets of The Titanic" video, in footage of the Olympic
approximately 5 min. 52 sec. into the documentary where
the cargo hold is being loaded. |
|
Aft
Well deck.
There
are two "portholes marked on the aft wall of the 2nd
class staircase forward of number five hatch. Sand these
off. There is no evidence to suggest that these existed
on the Titanic. |
|
Second
Class Library.
 The
windows are incorrect on parts J19 and 20. There are
five evenly spaced windows on each model part when there
were six in reality, being three pairs of two. For an
example of the window type please refer to page 65 of
'The Illustrated History'. The
windows are incorrect on parts J19 and 20. There are
five evenly spaced windows on each model part when there
were six in reality, being three pairs of two. For an
example of the window type please refer to page 65 of
'The Illustrated History'.
Cut
out all of the uprights between each window. Extend
the open rectangle forward and aft until the overall
rectangle is 21mm x 3mm using a square file. Create
the two sections of wall between the two windows using
sheet styrene 2.5 mm x 3mm. Divide the rectangle by
three to get the centerline for the wall sections. This
should leave you with your windows. Insert mullions
as described earlier but use a piece of K2 strip for
the divider between the two windows. Or use Bruce Beveridge's
decals.
|
|
|
|
|
B
DECK
|
Forward:
Parts
J13 A and B should have an extra window on the small
blank bulkhead approximately 2mm from the outer edge
of the part. This window measures approximately. 2mm
x 3mm (e.g. the same as the three other windows in the
part). There were -NO- mullions in these windows. The
corner of the port window can be seen in the black and
white photo of Ballard's "Discovery of the Titanic"
on page 143.
|
|
Forward
Cabins on B Deck:
The
rectangular windows on part J39 had -NO- mullions in
them. Carefully cut these out and file back the rough
spots (see any photo of the forward part of the ship).
|
|
Forward
Starboard Cabins on B Deck:
The
2nd window along B deck on the starboard side is too
far forward and needs to be relocated to match the port
side with the second window being about 1.5mm further
aft. Refer to any side shots of the ship like the Beken
photographs).This is not an easy fix so if you feel
uncomfortable with it, don't do it. It is better to
leave it alone than ruin the hull with a sloppy relocation
attempt.
There
are two ways to correct this and both have their drawbacks.
Option 1 leaves the windows misaligned with the C deck
portholes, option 2 means you also have to correct the
port side to match the starboard side. Modeler's choice.
Option
1:
Extend
the second window approx. 2mm further aft and then put
a piece of sheet plastic to the forward side to fill
the old section of window. Putty and sandpaper smooth.
To ensure proper window placement mark the position
of the first three windows on the port side onto a strip
of paper and transfer the measurements onto the starboard
side.
The
draw back with this method is that the windows will
be accurate on both sides of the ship but they are incorrectly
aligned with the portholes below.

Option
2:
To fix it you can drill a new window out of the plastic
area between the 2nd and 3rd window. Clean this up the
edges with your hobby knife and then fill the old #3
window with putty and sand smooth to hide the seams.

Option
3:
Remove
the plastic between the 2nd and 3rd window entirely
leaving one large hole. Then place sheet plastic inserts
into this opening at the appropriate locations to create
the proper distance between these windows. Putty and
sand any seams before painting.

|
|
Cafe
Parisien:
For
those of you looking to add a little detail to your
interiors there are some corrections to the windows
of the Cafe Parisien. See
INTERIORS 29d more information on creating this
interior.
All
of the mullions are incorrect. All of the windows should
have nine paned in the center panel and three in the
side panels (See Leo Marriott's "Titanic" p 52).

|
|
|
 You
will also need to add five arched windows forward of the
double doors. We believe that these were false windows
with a mirrored back because they looked into a corridor.
This is a good place to practice your arched window technique,
as it will not show too much if you make a mistake. You
will also need to add five arched windows forward of the
double doors. We believe that these were false windows
with a mirrored back because they looked into a corridor.
This is a good place to practice your arched window technique,
as it will not show too much if you make a mistake.
Glue
acetate to the inside of the Cafe Parisien walls to simulate
glass.
A
double door will need to be added forward of these four
windows. See DOORS 29 &
30.
|
 2nd
Class Smoking Room: 2nd
Class Smoking Room:
The
windows in parts H 6 & 7 have the correct spacing
but are too short. Carefully file them to approx. 3mm
high. These were a six paned windows with two larger
panes in the center
Part
J25 has a six paned window on the starboard side of
the smoking room lavatory, just above the No 4 hatch.
2mm x 3mm high and 2mm aft of the corner. The top of
this window can be seen in the picture on page 26 of
Illustrated History and clearly in the cutaway on page
50. Cut this out of the wall and install mullions using
your preferred method.
There was also a window in the same position on the
port side. It can be seen clearly in the picture of
Titanic being fitted out on page 25 of ' The Illustrated
History', however, it seems to disappear in later photos.
Research
by Bob Read and Bruce Beveridge indicate that this window
did not vanish but was covered over and so hard to detect
in photos. A photo of the Olympic when enlarged shows
the portside area with the window covered to protect
it while loading cargo in the port #4 hatch.
You can either add the with or without the cover. Modeler's
choice.
With
Cover:
Fashion
a cover from sheet plastic and glue to this wall.
Without
Cover:
Cut
the window out of the bulkhead and install mullions
and glass using your preferred method.
|
|
 There are two
arched windows in part J25 facing aft with one cross mullion
in them. These should be of the same style as the gymnasium
arched windows. There are two
arched windows in part J25 facing aft with one cross mullion
in them. These should be of the same style as the gymnasium
arched windows.
These windows
should be slightly narrower than molded. Add a plastic
strip to the inside of the opening and flush with the
wall. Apply the strip to the sides and arch only. Install
mullions and glass using your preferred method.
|
|
 2nd
Class Entrance: 2nd
Class Entrance:
Add
two windows in the forward facing wall of part J36. These
were 6 paned windows and can be seen in the center photograph
on page 120 of Triumph an Tragedy.
|
|
|
|
|
A-DECK
Here's
where the fun really begins as this deck needs a complete overhaul.
|
 Forward
Cabins in A Deck promenade. Forward
Cabins in A Deck promenade.
Are
molded as open windows, these were four pane mullion
in the shape of a cross.
|
|
 Portside
aft wall of forward grand stair case. Portside
aft wall of forward grand stair case.
A
door needs to be added to the out board edge of this
wall. See DOORS section
(door 21) for a description of this.
Add
two windows inboard of this door. These can be seen
in the Browne & Wels plans and the photo on page
75 of Marriott's "Titanic" looking forward from the
reading and writing room. You can see the two windows
through the large 7 x 4 pane window. |
Forward
wall of the Reading/writing room.
Add
the 7 x 4 paned window you're looking through in the
above photo and add the three pane section onto part
I 1.
To
make the three paned section take one of the discarded
A/M ratlines (having replaced them with the finer scaled
photoetched parts) and cut a section from them equal
to 4 rungs. When trimmed it will have 4 rungs and 3
spaces between.
Flip
it on to its side and dry fit.
Sand
it down on the sanding block to reduce it thickness.
Clean off the sanded plastic residue and glue to the
forward bulkhead of the raised Reading and Writing room
using the lower part of the window as a guide. We suggest
that you add this window after you have the decks assembled
and the roof of the lounge/reading & writing sub
assembly in place.
Only
the outboard pane will be seen as it is partially blocked
by the cowl vent.
Paint
the frame white. If you wish you can darken the recessed
areas to look recessed but it is not essential.
The
big bay window and adjacent windows in the reading/writing
room are wrong in that they only have half of the amount
of panes needed. Page 44 of Marriott shows the bay window
with 6 x 4 panes and three on top at boat deck level.
The windows on either side are 4 x 4 panes with two
panes on top at boat deck level. Replace with K 1 strip
or decals.
|
|
|
|
 Starboard
corridor connecting 1st Class stairway to 1st Class
Lounge. Starboard
corridor connecting 1st Class stairway to 1st Class
Lounge.
There
are two options here:
Option
1:
If
you refer to the deck plans in the 'Last Days of the
Titanic' or 'Legacy' plans you will see that this wall
had eight windows. If you use this configuration simply
add an extra window in the empty space.
Option
2:
The
the H&W plan of the Olympic that has some of the
Titanic modifications on it show only seven window to
the aft of the wall. Add the extra window into the space
in the center and fill the forward window.
Modeler's
choice. (I went with the Browne and Wels plan (Ed)).
|
|
1st
Class Lounge.
 The
top of the angled sections of the bay windows should
be arched not square. See page 76 of Shipbuilder &
p 170 of Ballard. The
top of the angled sections of the bay windows should
be arched not square. See page 76 of Shipbuilder &
p 170 of Ballard.
The
windows on the angled sections below the arch had four
panes with the crossbeam about two thirds of the way
up. These windows were slightly narrower than the non-angled
windows so you will need to fill and sand to get the
correct size.
The
non-angled windows had an elaborate curve section in
them. See Shipbuilder page 76 for both above windows.
Both
the Browne and Wels plans show a window on the starboard
forward wall of the 1st class smoking room. There is
no photographic evidence that I can find to corroborate
this. It did not exist on the Olympic as can be seen
in "Anatomy" page 127.
If
it existed as in the plan I would assume a similar type
of window as in the bay windows. Which style to choose?
Modeler's choice until some evidence comes to light.
|
|
Areas
forward of cabins A 36 and 37.
All
the windows in this area were if the nine-pane arched
variety.
To
allow for the correct spacing of windows in these areas
you must move cabins A36 and 37 further aft, which is
described in the BULKHEADS
section of the tutorial.
Port
Side:
Based
on Olympic plans Roy Mengot suggests that the port windows
should look like this:
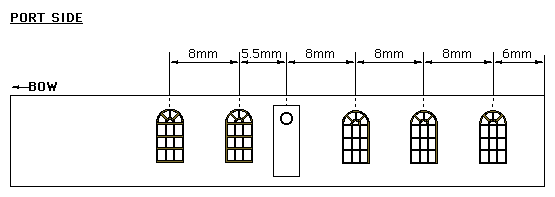
Fashion
a new wall using styrene sheet and cut the windows out
as discussed earlier.
Starboard
Side:
There
are three possible options for the starboard wall. The
choice is yours as to which you might consider the most
accurate.
Option
1:
Based
on Olympic plans Roy Mengot suggests that the port windows
should look like this:

Option
2:
A
second configuration for the port wall can be seen in
both the Wels and Browne deck plans. If you choose to
use it:

Option
3:
Bruce
Beveridge suggests a third configuration:
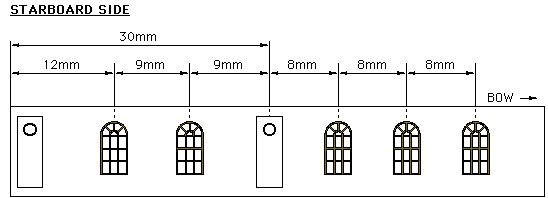
- Note:
The measurements from the center door forward
are based on the Olympic configuration the position
of the aft two windows are approximations.
|
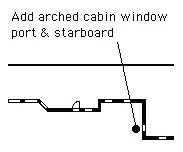 Cabins
A 36 and 37. Cabins
A 36 and 37.
Add
a window inboard on the forward wall. This can be seen
in both Wels and Browne plans and in the photo of a
crew member (Captain Smith ?) walking aft seen in most
books.
|
|
 1st
Class Smoking Room. 1st
Class Smoking Room.
The
windows are the correct configuration but the mullions
need to be replaced.
The
arches above the windows had no mullions in them. Carefully
cut them out and file arches down.
|
|
 Verandah
and Palm Court Cafes. Verandah
and Palm Court Cafes.
The
windows have been molded too short.
Carefully
file these down until approx. 2mm from the bottom. Use
the photo in Anatomy on page 130 as a guide.
These
windows are very intricate and are difficult to reproduce.
Decals are the answer here.
For
those who do not want to use decals I used the following
method:
1.
Replace mullions to form a large cross in the lower
section with cross piece at the base of the arch.
2.
To create the oval in the arch drill a hole down the
middle of a piece of rod and slice a section off to
create a ring. Then glue into the arched section. An
alternative is to drill into a sheet plastic strip with
a tiny bit and then cut it out around the hole with
small scissors and glue on to your constructed frames.
|
|
|
|
BOAT DECK
It is
not necessary to replace the mullions in this area because the
molded windows aren't too bad. However, there are some tabs
from the molding process on the back of some of windows and
some are filled with flash. Carefully file down the backs of
the windows until the excess plastic is removed.
|
Officer's
Quarters.
The
window layout of the of port and starboard sides of
the Officer's Quarters is incorrect.
Port
Side:
Add
fifth window aft.
Mark
up the window using the dimensions of the other windows.
Drill two small holes and then clean up the edges with
your hobby knife. To make a window frame cut a single
panels of the 1-bar A/M railing kit and paint dark brown.
Glue this over the hole and then add an Evergreen K1
mullion behind the bulkhead.
Fill
sixth window aft of the door. Use your preferred filler
and sand flat when dry.

Starboard
Side:
Add
third window aft of the door using method outlined above.
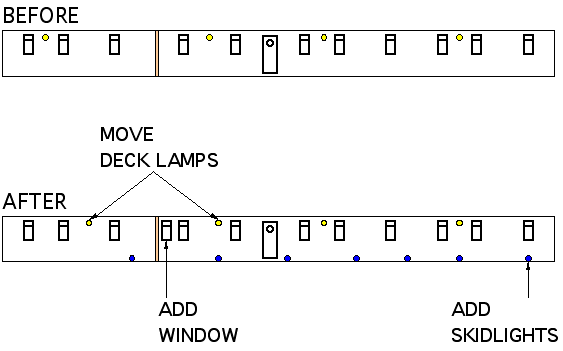
Forward:
There
is a window on the forward port wall of the Officer's
Quarters next to the bridge. This is moulded into part
G10A. This needs to be the same style as the other windows
so add the horizontal mullion 3/4 of the way up the
widow using K1 strip.
You
will also have to cut out a small square from part H11behind
where the window will sit otherwise the window will
look directly into a plastic wall.
|
|
Gym.
The
mullion configuration for all of these windows is incorrect
they should be nine paned windows, however, they are
too small to do anything with without serious damage
to the model. Put the two cross mullions behind the
windows to give some suggestion of the panes.
Some
of the arched sections are filled in. Take a very small
drill bit and drill them out, the panes will be round
but it's better than a filled window.
Window "Glass":
The
gym windows had a translucent, marbled textured glass.
Dan
Cherry suggests that you use semi-clear sheet protector
acetate to create a scale effect. This is especially
useful in preventing from seeing into the gymnasium
should you choose not to furnish this area.
Aft Gym Window:
The
window on part no J34 has two problems.
- It is
modeled too far inboard. When you add the 1st class
lounge roof in Step 18 it will intersect the window,
and
- The window
is too large when compared to the other windows in
part H11.
Fill the
existing window and create a narrower one further out
board. The deck lamp is also over represented so file
it off and replace it with a similar style to the ones
you have modeled for the rest of the area.
|
|
1st
Class Smoking Room.
Roy
Mengot states:
"There
are 3 portholes in the aft wall of the raised roof of
the 1st class Smoke Room. They face the 2nd class entrance.
One is centered and the other two are 8mm on either
side. You can make them out on the near flat wall as
it appears on the wreck in "Discovery of the Titanic"
p.169."
|
|
|
Tank Room.
|
 Starboard
Side: Starboard
Side:
The
model has three windows on the starboard side (part H27).
The Titanic only had the two forward windows. Fill in
the aft window with putty and sand flat.
One
door needs to be added to this bulkhead and one moved.
See DOORS section.
|
|
Aft
Bulkhead :
There
are two windows on the aft bulkhead (part J6). The port
window is in the correct location but the starboard window
should be further outboard. Refer to the Cork Examiner
photo graphs on page 107 & 107 of Titanic - Triumph
and Tragedy.
To
fix this slice a 2mm section out of the bulkhead outboard
of the window then cut close to the window on the inboard
side. Now swap the two parts and glue back into to place.
Fill and sand. To counteract the loss of plastic by the
saw you can glue some K 3 strip on the edges of each section
before you glue them back together.
|

|
|
|
#4
Funnel Deckhouse.
 Port
Side: Port
Side:
On
the port forward side are two single windows with a door
in between. Fill in the window immediately aft of the
door.
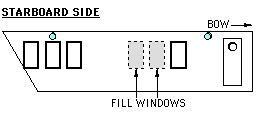 Starboard
Side: Starboard
Side:
On
the starboard side there are two groups of triple windows.
Fill the 2nd and 3rd window aft of the FIRST group with
putty, sand flush and paint flat white.
|
|
Second Class Entrance.
Item
1 (adding the forward windows)
Roy
Mengot states:
"On
the fore end, replace the single center window with two windows
evenly spaced along the walls. Tom Andrews' notebook specifies
7 windows, not 6, and this is the logical place. They are probably
symmetrical with the fore windows for the lower 2nd class entrance
seen in "Triumph and Tragedy" p.120 middle-left."
You
can either build and new wall with two windows in it or cut
the new windows out of the existing parts and fill the centre
window when you've assembled parts G29A & B.
Item
3 (aft arched window).
The
arched window in part G19 is very badly formed. Carefully file
this out to its correct size.
Item
2 (mullions)
All
of these windos were the nine paned arched variety.
Remove the mullions
in the arch and the add new mullions using your preferred method.
|
|
|
SEGMENT
ENDNOTES Thanks
to Bruce Beveridge for pointing out a few missing windows
and window styles.
|